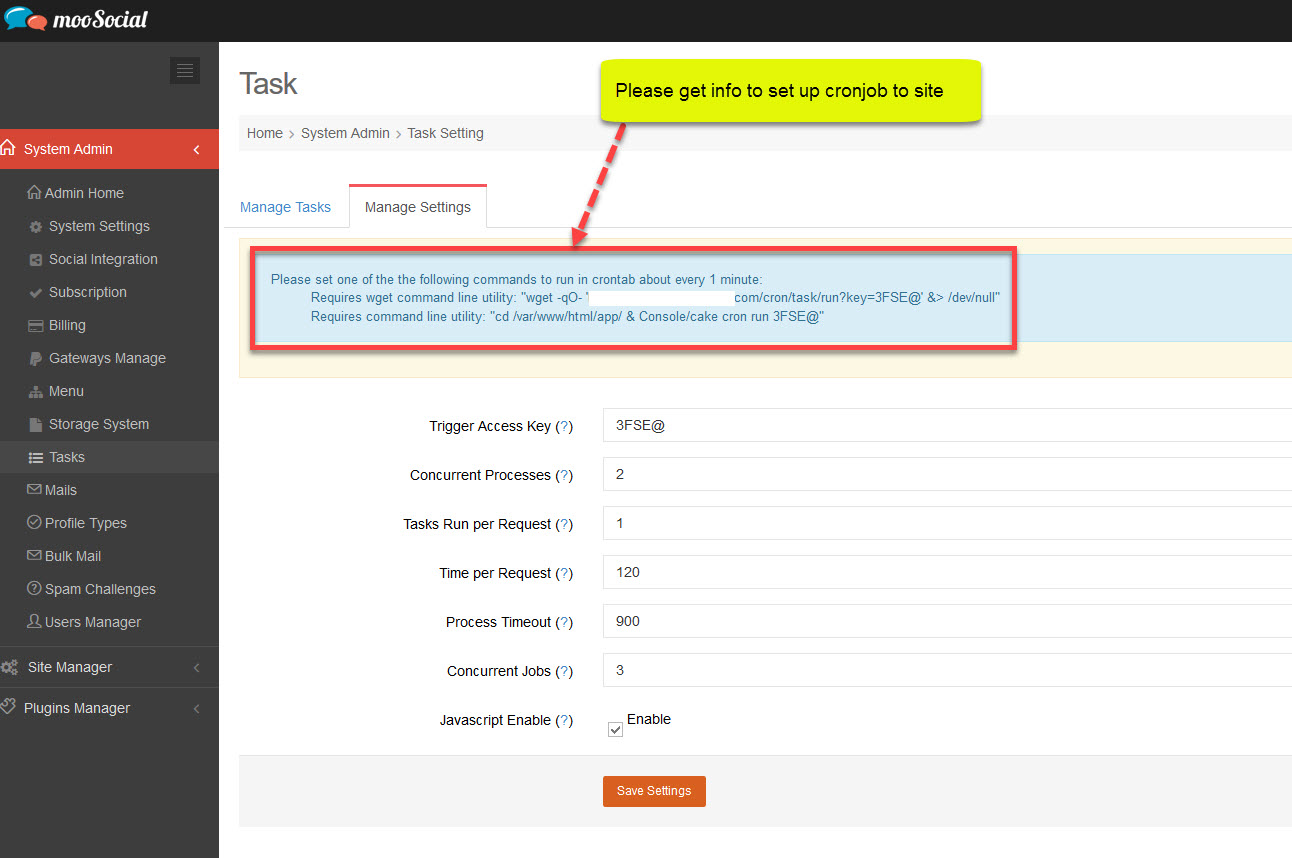
Before you start syning files to S3, you need to setup con job in your server:
Please Go to Admin dashboard --> System Admin --> Tasks to get the command line that you need to setup cronjob (see below screenshot). You can setup cron via cpanel or ssh. Contact your hosting if you don't know how to do that. Normally, the command line will be "wget -qO- 'https://domain.com/cron/task/run?key=3FSE@' &> /dev/null . Send this command line to your hosting if you want to ask them help you.
Sync missing images, fonts, css and js to Amazon S3
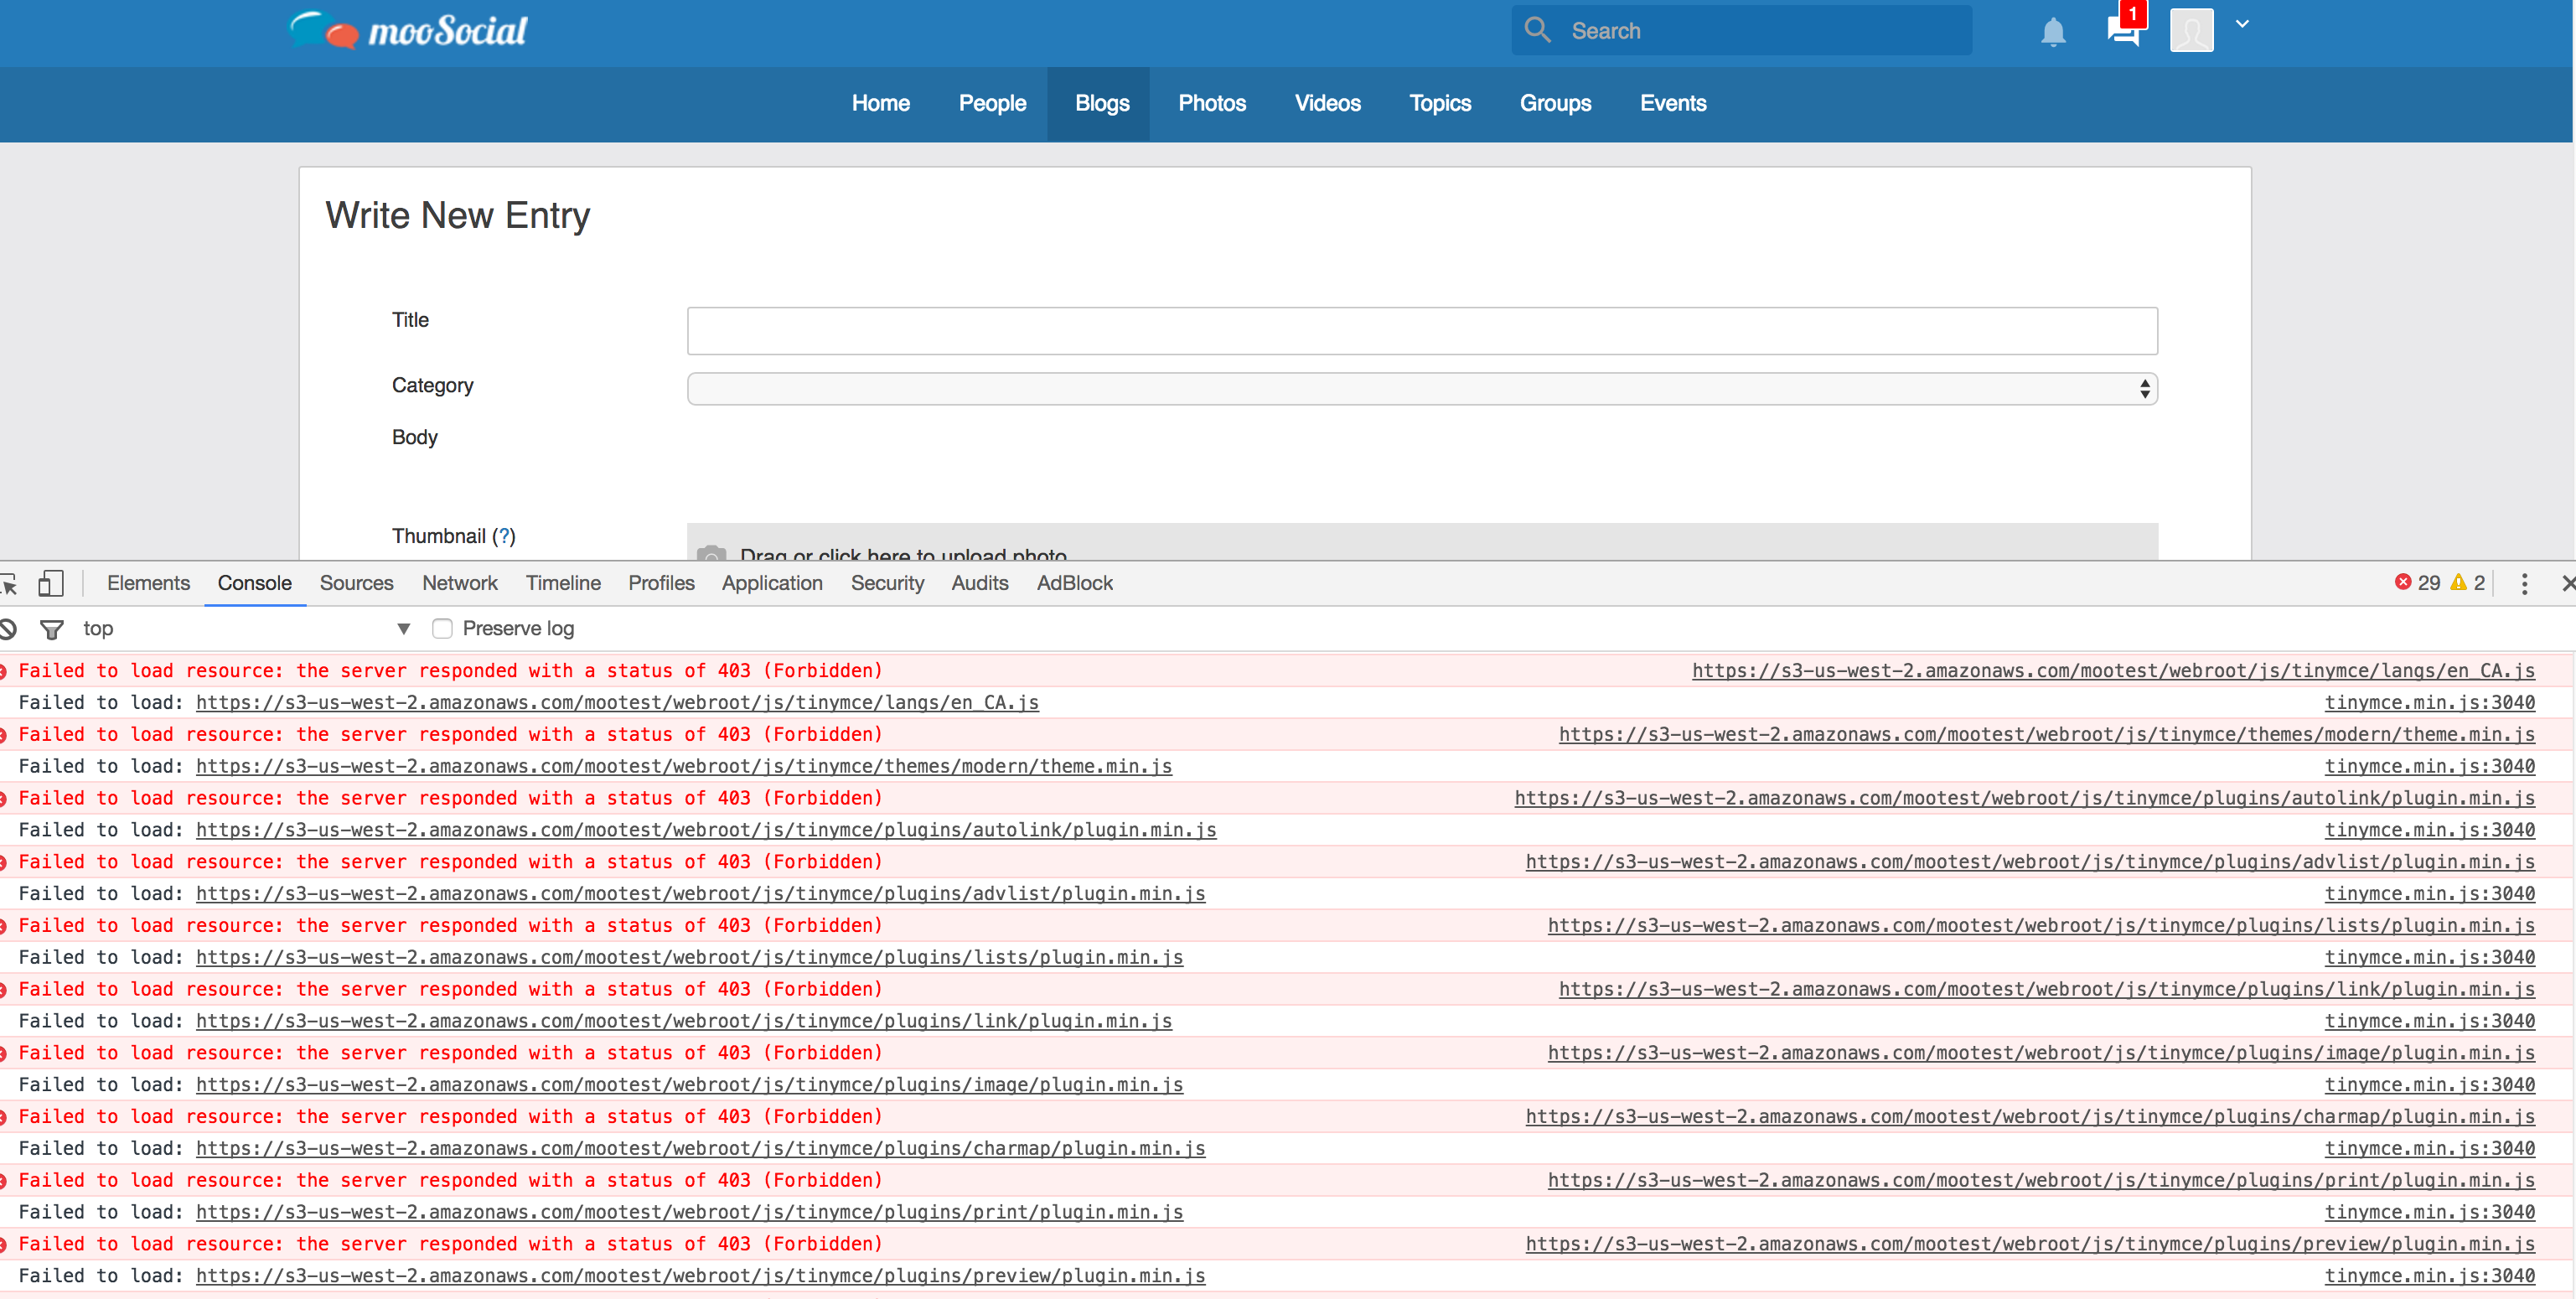
If S3 is enable and you find out some resources like css, font...are missing like the below screenshot. Please follow the below instructions to fix.
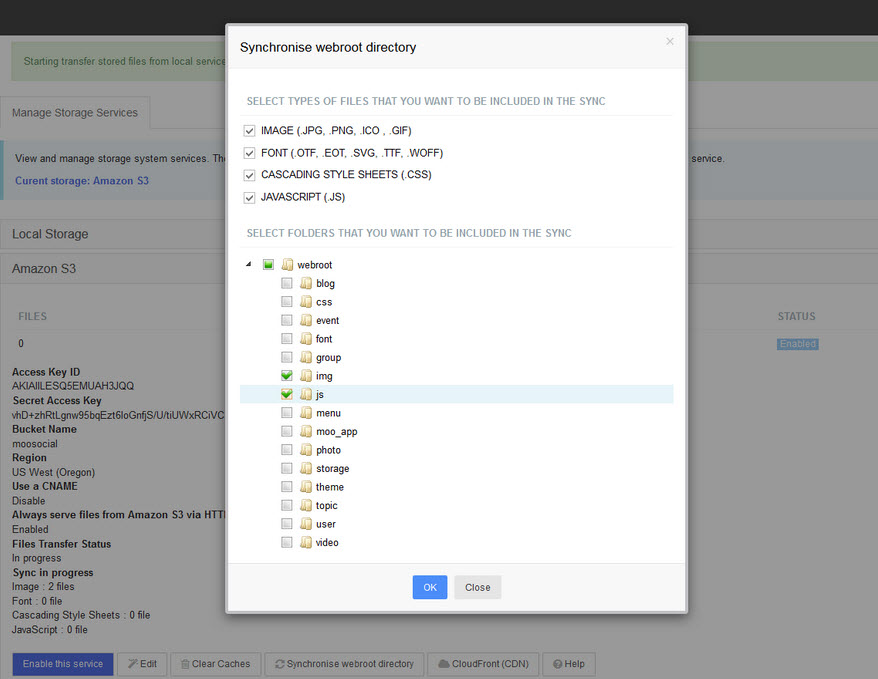
Go to admin dashboard --> System Admin --> Storage System --> Manage Storage Services. Click on "Synchronise webroot directory", and you willl see below popup.
Check Image, font, Cascading style sheets, Javascript then check the folders under "Webroot" that you have not syned/transfered to S3 before.
For example in the below picture you will tranfer files (images, fonts, css and js) in "img" and "js" folder to S3
Click OK to start Sync progress. You need to wait for a few minutes or may a few hours incase you have a lot of files that need to upload from selected folders to S3. The cronjob that you setup above will do this job so that you can close the web browser after clicking on "OK" button to sync.
Tranfer data to S3: In the setting page you will see a button called "Transfer", please click on this button if you enable S3 after site have launched long time ago to manually transfer all data such image, video... that uploaded by members before s3 is anabled to amazon.
Clear caches: If you have any problems after s3 is enable. Clear caches and then try again.
Hope it helps.
In most cases, installing mooSocial is a very simple process which takes only a few minutes to complete. Before the install there are a few things you need to know and do before the installation process.
By default, mooSocial is shipped with mod_rewrite enabled. If you are not installing mooSocial on apache server or your server does not have mod_rewrite, please read the last section of this guide. Or if your server is not running apache and you still want to use mod_rewrite, check out “Installing mooSocial without mod_rewrite” section.
Upload files and folders within mooSocial Directory to the desired location on your web server
Note: If your FTP client has an option to convert file names to lower case, make sure it's disabled.
Run the mooSocial installation wizard by accessing the URL in the web browser. This should be the URL where you uploaded the mooSocial files (Ex.http://example.com; http://example.com/moosocial)
Click Next to continue
Enter you database information and click Next. Unix Socket and Table Prefix are optional, leave them empty if you are not sure.
Enter your site name (Ex. mooSocial Demo). Site email is the email address your site will use to send out email notifications. Once chosen, default time zone will be preselected for all new signups.
Congratulations! You have successfully installed mooSocial. You are now ready to build you social network with mooSocial.
After finishing installing the software, you can login to your admin account and visit the admin panel to configure the site settings
Below are list of settings that you need to do after installing:
1. Integrate youtube api so that your member can share a video from youtube to your site
https://moosocial.com/wiki/doku.php?id=how_to:integrate_youtube_api integrate_youtube_api
2. Add your own logo:
https://moosocial.com/wiki/doku.php?id=how_to:add_a_custom_logo
https://moosocial.com/wiki/doku.php?id=how_to:remove_default_logo
3. Change general/system settings follow your choice:
https://moosocial.com/wiki/doku.php?id=admin_dashboard:system_admin:system_settings:general_settings
https://moosocial.com/wiki/doku.php?id=admin_dashboard:system_admin:system_settings:features_settings
4. Enable reCaptcha to prevent spammers:
https://moosocial.com/wiki/doku.php?id=admin_dashboard:system_admin:recaptcha_integration
5. Social Integration configuration so that your members can sign up to your site using their fb/google plus account
We offer Installation Service for customers who do not want to be bothered or feel comfortable performing the installation. It could be purchased in the Client Area of our website after the initial purchase of mooSocial license. Submit a support request with your site information once Installation Service has been ordered for us to initiate the installation process. Please allow up to 24 to 48 hours after submitting the support request for us to perform the installation.
By default, mooSocial is shipped with mod_rewrite enabled. If you are not installing mooSocial on apache server or your server does not have mod_rewrite, please read the section below. Or if your server is not running apache and you still want to use mod_rewrite, check out “Installing mooSocial without mod_rewrite” section.
Installing mooSocial without mod_rewrite
For some hosting services (e.g. GoDaddy, 1and1…), you might need to add RewriteBase statements to the .htaccess files mooSocial uses (/.htaccess, /app/.htaccess, /app/webroot/.htaccess).
RewriteEngine On RewriteBase /
If you don't want or can't get mod_rewrite (or some other compatible module) up and running on your server, you'll need to use the built in pretty URLs. In /app/Config/core.php, uncomment the line that looks this
Configure::write('App.baseUrl', env('SCRIPT_NAME'));
Also remove these .htaccess files:
/.htaccess /app/.htaccess /app/webroot/.htaccess This will make your URLs look like www.example.com/index.php/controllername/actionname/param rather than www.example.com/controllername/actionname/param/
Please follow the instructions below to translate or add new language to your moosocial site
1. Download Existing Language pack and install it into your mooSocial site
2. Download Existing Language pack and install it for an installed plugin
3. Join to translate existing Language pack
Free free to contact us if you have any questions.
How to create Google Developer key
8. Input the received key to Admin Dashboard --> System Settings --> Intergration tab. Below is example is for Google Developer Key.
If your site can not get avatar from Facebook or G+ login please check your server to make sure your site enabled allow_url_fopen and allow_url_include
The very first step of any project such as this is to back up every aspect of your site. This step is good practice before any major change but it is also a requirement of migrating your moosocial installation.
There are many plugins out there that will completely backup your site for you. This backup however, requires a more manual approach. Using an FTP program (such as FileZilla), connect to your web host and copy all files under your website’s directory to a folder on your local computer.
This includes the .htaccess file that is set to be hidden. Consult your FTP program’s help file to have it display hidden files if you are unable to see this file.
Depending on the number of media uploads you have in your site, this could take some time. While this download is underway we can begin step two and make a copy of your database.
Exporting your database is a simple process that only requires a few steps to complete. Login to the cPanel account of your web server and open the phpMyAdmin application. Select the database that contains your moosocial installation from the list on the left hand sidebar and once selected click on the Export tab on the navigation menu.
The default settings of a Quick export and the SQL format for the export are sufficient for what we need. Click the Go button and the database export process will begin and a file will be downloaded to your local computer.
Once the database export and the FTP transfer of your files have both completed, you are ready to move onto the next stage.
Before we can begin the migration to the new web host, we need to create an environment for a moosocial installation. To do this you must create a database that you can import your SQL data into.
Login to your new web host with the user credentials they have supplied you and connect to the cPanel software. For our guide we will be using the MySQL Databases application. If your web host doesn’t have that application running then you will should contact their support team to discover their method of creating new databases.
The steps to create a database are quite simple:
Write down the database name, the new MySQL username and its password. You will need them soon.
Browse to the folder on your local computer where you downloaded your website files to. In that folder there is a file called app/config/config.php that controls the access between moosocial and your database.
Make a copy of this file and store it in another folder on your local computer. This is necessary for restoring the changes we are about to make should something go wrong later.
Open the original version of the file with your favorite text editor and make the following three changes:
Locate the following line:
The db_name portion of this line will currently be set to the MySQL database name of your old web host. This must be changed to the name of the new database you have just created.
Below this you will find the line:
In this line you need to change the db_user portion from the username of your old host to match the new username you have just created.
Finally, edit the third line:
As with the others the db_pass section of this line must be changed to the new secure password you created for your MySQL user.
Save config.php and close the file.
Now that you have a new database to work with we can begin the import process.
Launch phpMyAdmin from the cPanel software on your new server and select your new database from the list on the left hands sidebar. Once it opens select the Import tab from the navigation menu.
In the File to Import section click the Choose File button and select the SQL file you exported previously.
Un-tick the Partial Import check box, make sure the format is set to SQL and then click the Go button. The database import will now begin.
The time this import takes varies depending on the size of your database. You should receive a message informing you of the success of the import when it has finished.
Now that you have the new database prepared and you’ve reconfigured the config.php file, it is time to begin uploading your website’s files.
Connect to your new web host using your FTP program and browse to the folder that your website is going to be held. If this is the primary, or only site being installed on this web server then uploading the files to the public_html folder is the usual directory.
With the remote directory selected you can upload your website files that should now include the updated version of config.php. As with the earlier download, this process can take some time.
Don’t delete these files from your local computer once the upload finishes. They are still needed until the final steps have been completed.
As you can see, when broken down into the above simple steps, the process isn’t that difficult. All it really requires is for you to be careful at each step and give yourself the option to go back to the original version until the last possible moment (in case of any problems).
Have you migrated your moosocial website recently? Let us know your experience with the process in the comments section below!
- Log to your backend
- Under System Admin > System Settings
- Search for "Auto add friend with" field
- Enter Your Account Name
Access to Admin Dashboard --> Site Manager --> Theme Manager --> Theme Settings
#1: Enable/ Disable Theme. If this option is enable, the custom settings will apply to current active theme
#2: Click on Reset Settings --> Back to default setting of current active theme. System will ingore all of changes made so far.
#3: User select color --> Page Background color will be changed
#4: User can select color or upload photo.
- If user uploads photo, header background will be this photo.
- If user click on Reset, header background will reset to default
#5: User can select color. If user selects color, this color will displayed on site
#6: If "Apply to Landing Page" is checked, theme will apply to landing page
#7: User can select color. If user selects color, this color will displayed on mobile
Save settings and enjoy
Hope it helps.
1/ Go to console.developers.google.com
2/Login your google account & create a project:
#Press on Create a Project.
3/Fill in your Project’s Name :
#1 Fill your project’s name
#2 Create
*Agree to Terms and Conditions if they’re showing up.
4/After your project is done creating, go to API Manager/Overview of your project :
Select Google+ API
5/Enable your Google+ API:
#Press on Enable API to enable.
6/Choose Credentials tab, hover mouse on Create credentials button and choose OAuth client ID:
7/We have to configure consent screen first:
#Press on Configure consent Screen then continue
8/Register at your Consent Screen :
#1 Check your Email
#2 Enter your Product’s name
#3 Save
9/Once you had registered your consent screen, Start Creating Client ID :
#1 Select Web Application
#2 Enter your site’s domain
#3 Enter your callback’s URL, this URL has the format: [yoursite/social/auths/endpoint/google?hauth.done=Google]
#4 Create Client ID
10/ Review your Client ID, it should be looked like this:
#Your Client ID
11/ On Credentials tab, click on credential name hyperlink, start configuring:
The Client Id on Google:
-Copy 1, 2, 3 to your settings Admin Dashboard/Socials Integration/Google one by one.
-Enable, check!
-Save Settings
*Remember to check if any space in the fields.
*Remember your site could be [https] instead of [http], they will not recognize if site was [https] and Client ID & Admin Dashboard were [http].
* Both sides, Admin Dashboard and Client ID must be configured synchronously for the 1, 2, 3, they must be same to each others.
Your Login Page and Sign Up Page should be looking like this, with Facebook and Google button
How to configure the sandbox paypal express checkout payment gateway
1. Login to sandbox.paypal.com
You must have a PayPal Business account to make calls to the sandbox PayPal servers. Log in to your Business account on the following page: https://www.sandbox.paypal.com
2. Navigate to the API Access page:
Click on to Profile (Setting) icon in the top right and select Profile and Settings from the drop-down menu.
Then navigate to My Selling Tools --> API Access and click Update.
Note If you do not see the Profile (Setting) icon in the top right, navigate to the API Access page by hovering on More --> Site Map --> Change business info --> My Selling Tools --> API Access.
3. View Credential info
Click on View API Signature link
Then, copy and paste the API username, password, and signature into your site
Access to your site Admin Dashboard/ Gateways Manage/ PayPal Express Checkout/ Edit:
Enable: Check to enable PayPal Express Checkout
Test mode: Check to enable sandbox environment from your mooSocial.
4. Configure Instant Payment Notification (IPN):
Go to Profile and Settings --> My Selling Tools --> Instant payment notifications --> Update
Click on Choose IPN Settings button
#1 : Input [yoursite URL]/paypal_expresss/ipn_recurring to Notification URL textbox
#2 : IPN message --> check on Receive IPN messages (Enabled) checkbox
And click on Save button for changes.
5. Apply PayPal Express Checkout on site
Please follow these following steps to switch mooSocial site from trial to full version:
- Go to installed folder of trial site and back up the 2 files: app\Config\plugins\plugins.xml and app\Config\settings.php
- Download full version package and unzip it
- Upload the unzip files and folder, replace trial files and folders on your hosting.
- Upload the two back up files: app\Config\plugins\plugins.xml and app\Config\settings.php to replace the existing two new files.
- Clear global cache and test site again. All users, blogs, photos..will be intact
For change default cover for desktop site please change your cover you would like to change to cover.jpg and copy overwrite new cover to app/webroot/img/cover.jpg
For change default cover for mobile app please change your cover you would like to change to cover.jpg and copy overwrite new cover to app/webroot/theme/mooApp/img/cover.jpg
After changed file please remember please global cache and your browser cache before testing
To change your Brand name into Powered by at bottom of site please use FTP your Cpanel to go to
/app/View/Themed/Default/Elements/region/ and edit footer.ctp at line 10 you will see:
<a href="./" target="_blank">Your Brand name</a
1/ Go to developers.facebook.com
2/Login & select My apps/Add a New App:
3/Fill in your Disable name and your contact email fields and click Create App ID button:
4/ After your App created, Click Setting/Basic from left menu
#1/ Enter your site Privacy Policy URL
#2/ Enter your site Terms of Service URL
#3/ Select Social Networks & Dating for Category field
#4/ Click Add Platform, and select Website:
After selected Platform is Website then ensure your Site URL is correct.
5/ Go to App Review below Settings tab, switch to Yes:
6/ Create Product: Go to Dashboard from left menu and click Product and click Setup button for Facebook Login
7/ After Set up button from Facebook login is clicked, it will link to Facebook login Quickstart page, select WWW icon:
8/ Enter your site URL again on Tell us what the URL of your site is.
9/ Go to Facebooklogin/Settings and enter your valid OAuth redirect URIs, ex: your site url is https://community.moosocial.com/ then you need to enter https://community.moosocial.com/social/auths/endpoint/facebook/ into valid OAuth redirect URIs field
10/ How to configure your Admin Dashboard:
Go to Admin Dashboard/Socials Integration/Facebook
Then:
Get #1 and #2 from fb app and copy to your Admin Dashboard/Socials Integration/Facebook
#1: Your App ID from your FB app (in your FB app/Settings/Basic)
#2: Your App Secret from your FB app (in your FB app/Settings/Basic, the App Secret will show after pressing Show button and re-enter your FB password.
#3: Your callback url that configured from step 7.3 which has the format: [yoursite/social/auths/endpoint/facebook/]
#4: Save Changes.
*You dont need to config SDK version used in Admin Dashboard, system will be detected automatically.
*Remember to check if any space in the fields.
*Remember your site could be [https] instead of [http], they will not recognize if site was [https] and Client ID & Admin Dashboard were [http].
Please follow to configure mooSocial after finish installing mooSocial
Configure these plugins if you buy those
Frequently Ask Question
Step1: To check your daily request quota from google api, please go to https://console.developers.google.com/ and login into your googel account
Step2: Select your app api from select project page
Step3: After selected your project api, click Navigation Menu -> IAM & admin -> Quotas
Step4: On Quotas page you will see all your service Quotas
Step5: To increase your service quota please click a service. Ex I click Maps JavaScript API service i will link to Maps JavaScript API service page click edit icon to open Map loads quota limit. And on this pop-up you will see " To increase this maximum, enable billing for this project. " click this link to enable billing for your project (Note: after you add you credit card it will allow you use trial a year)
Step6: Please follow all step to add this project to a billing account, after you linked, google will allow you use Unlimited quotas
MAKE CHANGE FOLLOW THE BELOW STEPS MAY CRASH DATABASE, PLEASE BACKUP YOUR DATABASE FIRST. IF YOU'RE NOT SURE HOW TO DO, PLEASE CONTACT US.
1. Full backup database first. IT'S VERY IMPORTANCE
2. Please run the following queries to update database structure:
ALTER TABLE `activities` CHANGE `content` `content` TEXT CHARACTER SET utf8mb4 COLLATE utf8mb4_unicode_ci NOT NULL;
ALTER TABLE `{PREFIX}activity_comments` CHANGE `comment` `comment` TEXT CHARACTER SET utf8mb4 COLLATE utf8mb4_unicode_ci NOT NULL;
ALTER TABLE `{PREFIX}comments` CHANGE `message` `message` TEXT CHARACTER SET utf8mb4 COLLATE utf8mb4_unicode_ci NOT NULL;
ALTER TABLE `{PREFIX}conversations` CHANGE `message` `message` TEXT CHARACTER SET utf8mb4 COLLATE utf8mb4_unicode_ci NOT NULL;
ALTER TABLE `{PREFIX}comment_histories` CHANGE `content` `content` TEXT CHARACTER SET utf8mb4 COLLATE utf8mb4_unicode_ci NOT NULL;
Importance: if you you have database prefix, please replace {PREFIX} with your own prefix. If you don't have a {PREFIX} you can remove {PREFIX}.
Ex: your database Prefix is: "Travel_" -> please replace the {PREFIX} with Travel_. The query after replaced the Prefix will look like this:
ALTER TABLE `Travel_comment_histories` CHANGE `content` `content` TEXT CHARACTER SET utf8mb4 COLLATE utf8mb4_unicode_ci NOT NULL;
3. Go to ...app/Config/config.php and make the following change
change "encoding" => "utf8" to "encoding" => "utf8mb4"
Comments (0)